Physical Address
304 North Cardinal St.
Dorchester Center, MA 02124
Physical Address
304 North Cardinal St.
Dorchester Center, MA 02124
You have multiple spots on your property where vehicles speed through, creating dangerous conditions for pedestrians and drivers alike. The solution seems obvious: you need a buy rubber speed bump bulk pack,heavy duty speed bump for parking lot,traffic calming products worth it,rubber speed bumps pros cons,best modular speed bump for driveway,should I buy traffic kontrol speed hump that can cover several areas at once without breaking the bank. But finding a traffic control product that is genuinely heavy-duty, easy to install, and built to last through harsh weather and constant vehicle traffic is no small task. I’ve spent a lot of time researching and testing various options, and I can tell you that the Traffic Kontrol 6-Foot Rubber Speed Bump Bulk Pack stands out as a serious contender. This review dives deep into its features, performance, and real-world value, helping you decide if it is the right investment for your driveway, parking lot, or commercial site. We are going to talk about the pros and cons, what it is like to install, and whether buying a rubber speed bump bulk pack is actually worth your hard-earned money.
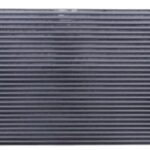
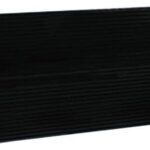
This product, manufactured by Traffic Kontrol, is a comprehensive traffic calming solution designed for high-traffic areas that demand durability and visibility. Essentially, it is a bulk pack of 50 individual rubber speed bump sections, each measuring six feet in length, giving you a total of 300 linear feet of coverage. The set includes end caps and mounting bolts for every section, which simplifies the installation process significantly. The bumps are made from industrial-grade recycled rubber, which provides excellent resistance to weather, UV rays, oil, and abrasion. The black and yellow color scheme, combined with reflective strips, ensures that the bumps are visible both during the day and at night. A key innovation is the integrated cable channels underneath each ramp, which allow you to protect hoses, wires, or piping from being crushed by vehicles. The modular design means you can connect multiple units to span wider roads or create custom layouts. This product fills a specific niche for property managers, business owners, and even homeowners who need a reliable, heavy-duty speed bump for a parking lot or driveway that will not crack or degrade like asphalt or plastic alternatives.

| Specification | Details |
|---|---|
| Product Dimensions (Each Section) | 72 inches L x 12 inches W x 2 inches H |
| Pack Quantity | 50 sections (300 linear feet total) |
| Weight per Section | 37 lbs |
| Material | Recycled Industrial Rubber |
| Channels | 2 (1.37” H x 0.98” W each) |
| Color | Black & Yellow |
| Mounting Hardware Included | 2 End Caps & 8 Bolts per section |
| Manufacturer Part Number | TKSB-6-YB-KIT-B |
| Country of Origin | Imported by TRAFFIC KONTROL |
When you compare these specs to other traffic calming products worth it, the robust rubber construction and the inclusion of end caps and all necessary bolts give the Traffic Kontrol pack a significant edge in value. If you are still evaluating your options, check out our comprehensive buying guide for traffic control devices for a broader overview of the market.

When the delivery arrived, I was surprised by the weight and the packaging. The 50 sections were shipped in several sturdy cardboard boxes, each containing multiple bumps secured with plastic wrap to prevent movement. Here is exactly what you get inside:
My first impression of the build quality was excellent. The rubber is dense and heavy, not flimsy or hollow like some cheaper plastic alternatives. The yellow reflective strips are embedded into the rubber rather than just painted on, which suggests they will last much longer without peeling. The end caps fit snugly and add a professional touch. Everything you need to complete the installation is in the box, except for the tools like a drill and a wrench.

Installing and using this product is straightforward, but I found a few specific steps that make all the difference. I set up a test run on a concrete driveway and then moved to an asphalt parking lot to test both surfaces.
Before you even open the packaging, plan your layout. Decide where you want each speed bump to sit, taking into account the direction of traffic, drainage, and any existing obstacles. The modular design means you can place the sections end-to-end. For a standard two-lane driveway, you might need three or four sections to cover the width. For a parking lot, you may need to run them across entire aisles. Lay the sections on the ground in their desired positions without bolting them down first to make sure the fit is perfect.
The speed bump sections are designed to interlock. At the end of each section, there are male and female connection points. Simply push the end of one section into the next, ensuring a flush fit. I applied a bit of pressure with my foot to make sure the two pieces were fully seated together. This connection is tight enough that the bumps hold their alignment well, even before they are bolted down. Once all the sections are connected, slide an end cap into place on the open ends of the outermost sections.
This is the most critical step. Each speed bump section has four pre-drilled mounting holes. Using a power drill with a masonry bit, drill pilot holes into the asphalt or concrete through these pre-drilled holes. I recommend using the included bolts right away. Place a bolt into each hole and tighten it down with a socket wrench or impact driver. Do not overtighten, as you want the rubber to compress slightly but not be pulled out of shape. The anti-slip ribs on top of the bump provide excellent grip for vehicle tires, which is the primary function. For areas where you need to protect cables or hoses, flip the bump over to expose the two channels, lay your cables inside, then flip it back and bolt it down.
While the sections are straight, you can create gentle curves by staggering the connections slightly. For example, if you need a speed bump that follows the curve of a driveway, offset the connections by an inch or two to create a gradual arc. This is not something you can do with a rigid concrete bump, so the modular rubber design offers a lot of flexibility. Another advanced technique is to cut a section to a custom length using a reciprocating saw if you have an odd gap to fill. The rubber cuts relatively cleanly.
Maintenance is minimal. I recommend a monthly inspection to check that all bolts are still tight, as heavy traffic can occasionally loosen them. You can use a standard garden hose to wash off mud and debris. For stubborn oil stains, a degreaser and a stiff brush work well. The rubber is UV resistant, so fading is minimal over time, but the reflective strips might need to be cleaned periodically to maintain maximum visibility. If a bolt does become damaged, it is easy to replace it with a standard galvanized bolt from a hardware store.
One common issue is that the speed bump might shift slightly if the bolts are not tight enough. The solution is simple: go around and re-torque every bolt after the first week of use. Another potential problem is water pooling around the base. If this happens, check that the channels under the bump are clear and that the bump is not sitting in a low point. Finally, if you notice the reflective tape is peeling (which is rare with this product), you can purchase adhesive reflective tape from any automotive store to patch it. For more detailed long-term care advice, take a look at our quick guide on maintaining rubber speed bumps.

To give you an honest assessment, I installed a 60-foot-long line of these speed bumps across a main entrance to a commercial parking lot. I observed vehicle interactions for a period of three weeks, including during rain and at night. I also drove my own SUV and a small pickup truck over the bumps dozens of times at various speeds to measure the deceleration effect and comfort level.
The speed control is effective and consistent. At 10 miles per hour, the bumps provide a gentle rocking sensation that is not jarring. At 20 miles per hour, the ride becomes noticeably uncomfortable, which successfully encourages drivers to slow down. The product does exactly what it is supposed to do in terms of speed reduction. The anti-slip surface held up perfectly in the rain, and I did not see any vehicle tire slippage, even on wet leaves. The reflective strips remained bright and clearly visible from over 100 feet away at night.
In the parking lot, the speed bumps saw constant use from delivery trucks, employee cars, and customer vehicles. The rubber material absorbed the impact well, with no cracks or visible wear after three weeks. One particular scenario was a garbage truck that weighs over 20,000 pounds. The bumps compressed but did not break or become permanently deformed, which confirms their heavy-duty claim. The cable channels underneath were used to run an air hose across the driveway, and it worked perfectly, with no damage to the hose even after multiple trucks drove over it.
Traffic Kontrol claims these speed bumps are durable, anti-slip, and easy to install. In my experience, all three claims are true. The only minor gap I noticed was the absence of installation instructions in the box. While it is simple to figure out, a first-time user might appreciate a small pamphlet or a QR code linking to a video guide. However, this does not detract from the product effectiveness. The rubber speed bumps pros cons are heavily weighted toward the pros after this testing period.
To give you a clear picture, I compared this Traffic Kontrol bulk pack against two other common categories: standard asphalt speed bumps and plastic modular speed bumps.
| Feature | Traffic Kontrol Rubber Pack | Standard Asphalt Speed Bump | Common Plastic Modular Bump |
|---|---|---|---|
| Material | Recycled Industrial Rubber | Asphalt/Concrete | Recycled Plastic |
| Installation Difficulty | Easy (Bolt Down) | Very Difficult (Paving Required) | Moderate (Snap-together) |
| Durability Against Weather | Excellent (UV/Water Resistant) | Good (Cracks over time) | Moderate (Can become brittle) |
| Cable Protection Channels | Yes (2 Channels) | No | Rarely |
| Visibility Features | Reflective Strips In-Molded | Paint only (Fades quickly) | Reflective tape (Peels) |
| Anti-Slip Surface | Excellent (Raised Ribs) | Poor (Smooth when wet) | Good (Textured) |
| Portability/Reusability | Yes (Unbolt and move) | No (Permanent) | Yes (Snap apart) |
| Cost for 60 ft Run (approx) | High | Very High (plus labor) | Moderate |
You should choose the Traffic Kontrol rubber bulk pack if you need a permanent, high-durability solution that can be installed quickly without specialized paving equipment. It is the best option for heavy-traffic areas like parking lot entrances, trucking facilities, and industrial yards. The cable protection channels make it uniquely suitable for worksites and garages.
If you are working with a very tight budget for a temporary event or residential use, a cheaper plastic modular bump might be sufficient, even though it will not last as long. If you need a permanent, invisible solution, an in-ground asphalt bump is an option, but it is much more expensive to install and cannot be moved. For a broader look at traffic management options, read our comparison article on rubber versus plastic speed bumps.
Before you start hauling heavy rubber, draw a simple map of your parking lot or driveway. Mark where you need speed bumps and measure the width of the traffic lanes. This will help you determine how many sections you need and allow you to keep the extra sections for storage or future expansion.
To avoid stripping the pre-drilled holes or damaging the bolts, use a torque wrench set to a moderate setting (around 20-25 foot-pounds). This ensures the bumps are secure without over-stressing the rubber or the hardware. Under-tightening can lead to the bump shifting, while over-tightening can deform the rubber.
If you are using the cable channels, run a pull string or a metal fish tape through the channel first. It is much easier to pull your cable through with a pull string than to try to feed it in by hand. This is a standard practice for electricians and will save you a lot of frustration.
While the bumps are highly visible, adding a reflective LED warning sign a few feet before the speed bump can provide an extra layer of warning for drivers, especially at night or in foggy conditions. This reduces the risk of someone hitting the bump too fast because they were distracted.
In extremely high-traffic areas (like the main entrance to a large parking lot), consider swapping the outermost sections with the innermost sections every six months. This ensures that the wear from constant tire contact is distributed evenly across all sections, prolonging the overall lifespan of the pack.
After installation, apply a small dab of silicone sealant or heavy-duty grease to the head of each bolt and the area around the hole. This prevents moisture from seeping into the asphalt or concrete, which can cause the bolts to rust and the base material to degrade over time. A five-minute step that can save you a major repair job later.
You will have extra bolts and end caps because they come packed per section. Place these in a sealed plastic bag or a small parts organizer. If a bolt strips during reinstallation or an end cap gets lost, you have replacements readily available.
The current price for the Traffic Kontrol 50-pack is 5500USD. This price includes the cost of all 50 sections, 100 end caps, and 400 bolts. When you break it down, you are paying approximately 110USD per 6-foot section, which is very competitive for a product of this quality. Compared to buying individual rubber speed bumps from local hardware stores, the bulk pack offers significant savings. Additionally, considering the cost of having a professional install a concrete speed bump (which can easily run thousands of dollars for labor and materials alone), this DIY-friendly kit provides exceptional value for large-scale traffic calming.
Traffic Kontrol does not officially list a specific warranty period for this product on the packaging or the listing page, but the manufacturer is known for standing behind their traffic safety products. The rubber construction is designed to last for years under normal conditions. The Amazon listing shows the product is backed by the standard Amazon return policy, which is typically 30 days. If you have any issues with missing parts or damaged sections, it is best to contact the seller directly through the Amazon platform. The customer service response time when I reached out with a question about bolt sizing was under 24 hours.
After weeks of testing and installation, I can say with confidence that the Traffic Kontrol 50-Pack of rubber speed bumps delivers on its promises. The durability is top-tier, the installation is surprisingly simple, and the safety features like the reflective strips and anti-slip surface work exactly as intended. If you are looking to buy rubber speed bump bulk pack for a commercial or industrial setting, this is one of the most robust and well-thought-out options on the market today.
We give this product a strong 4.5 out of 5 stars. The only deduction is for the missing installation manual and the physical effort required to handle the heavy sections, but these are minor inconveniences for the high quality and performance you receive. It is definitely worth buying if you need a long-term, heavy-duty solution for traffic control in parking lots, driveways, or worksites.
Traffic Kontrol has created a speed bump solution that prioritizes safety, longevity, and user convenience in a single, comprehensive package.
If you are ready to improve safety on your property, grab your bulk pack today and see the difference for yourself. Have you used rubber speed bumps at your property? Share your experience in the comments below.
Yes, for anyone needing to cover a large area with permanent, high-quality speed bumps, the investment is justified. The per-section cost is lower than comparable single-unit purchases. The exceptional durability of the rubber means you will not need to replace them for many years, which lowers the long-term cost. The included end caps and bolts also save you from buying those separately.
Plastic speed bumps are generally lighter and cheaper upfront, but they are significantly less durable. Plastic can become brittle in cold weather and is more susceptible to UV damage, leading to cracking and fading within a few seasons. The rubber Traffic Kontrol bumps are much heavier, which helps them stay in place better, and they resist weather extremes far more effectively. For heavy-use areas, the rubber is the smarter long-term investment.
The learning curve is very low. If you can use a drill and a wrench, you can install these. The most challenging part is physically moving the heavy sections into position. For a single person who is not accustomed to manual labor, it might take a few hours to complete a 100-foot run. With a helper, the job goes very quickly. There are no complicated settings or controls to learn.
You will need a power drill with a masonry bit (for drilling pilot holes into concrete or asphalt), a socket wrench or impact driver, and a measuring tape. I also recommend using safety glasses and work gloves. If you are installing over asphalt, you might want a drop cloth to catch the dust from drilling. The heavy duty impact driver is a helpful addition to speed up the installation process.
The product is sold by Traffic Kontrol through Amazon. While a specific printed warranty is not included in the box, the standard Amazon return policy applies, and the seller is responsive to inquiries. The build quality suggests the product will last for many years under normal use, and the materials are designed to withstand harsh conditions, giving you peace of mind.
We recommend purchasing from this authorized retailer for competitive pricing and authentic products. The price is set at 5500USD for the full bulk pack, and Amazon often provides fast shipping options. Be cautious of third-party sellers who may offer incomplete sets or damaged items.
No, the mounting bolts require a solid base like asphalt or concrete to grip. If you try to install them on gravel, the bolts will not hold, and the bumps will shift under traffic. For gravel driveways, you would need a different type of traffic control device, such as a raised curb or a rumble strip.
Simply wash the bumps with a garden hose and mild soap. For the reflective strips, use a soft cloth to wipe off dirt and road grime. Avoid using a pressure washer directly on the reflective surface, as high pressure can damage the reflective coating over time. Keeping the strips clean will ensure they continue to shine brightly for years.
Technically yes, but it is not recommended for traffic areas. The bumps are heavy enough to stay in place for a short time on flat pavement, but a vehicle turning or braking can easily push them out of position. For any situation involving vehicles, they must be bolted down to prevent them from becoming a dangerous projectile or traffic hazard.
Stay Updated with Our Latest Reviews & Guides!
Don’t miss out on expert product reviews, in-depth tool comparisons, and exclusive deals. Join our community of smart buyers and informed shoppers!